Ashley Marie
  • Blog
  • About
  • Contact

Tiny Spherical Worlds

2/21/2016

0 Comments

 
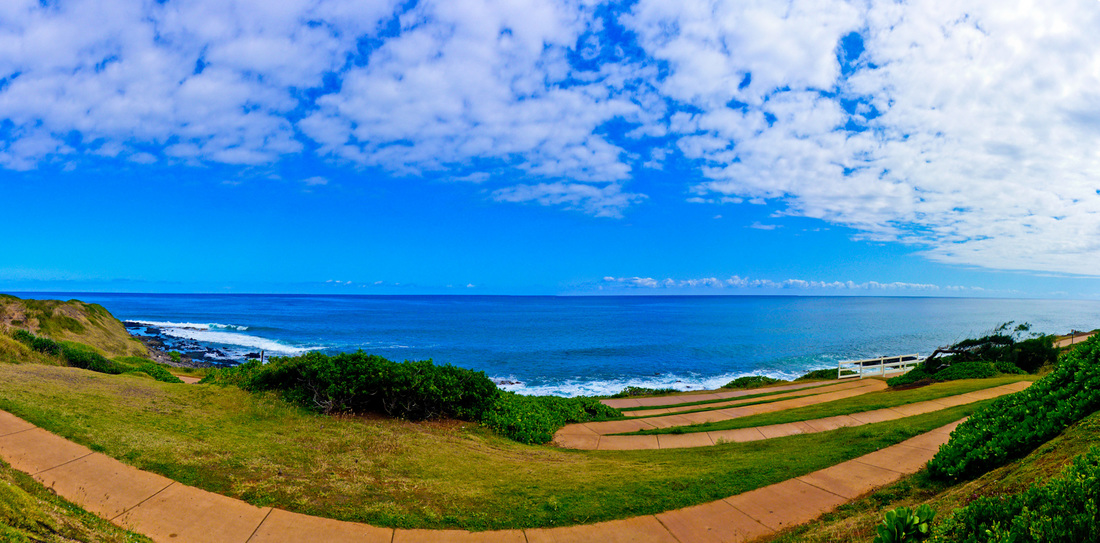
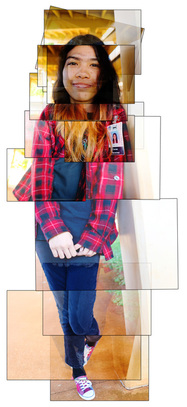
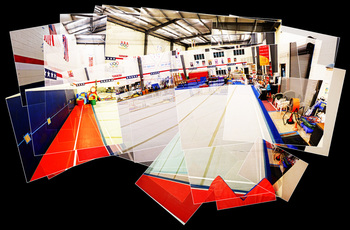
Hi again, it's me. I just wanted to tell you about a new project that we are starting in our Kapaa Middle School G.T class.  We are making spherical and polar panoramas.  I am really excited for this new project.  Now, you are probably thinking about what spherical panoramas, and polar panoramas are, so I will tell you.  But first, I wanted to tell you how we are making them.  We are talking about composite images which is combining a bunch of images into one big image.  Composite images are really cool and they are used to make the overall image illuminate and come to life. While a single image will only show what the camera can show,  the many images put together will make the image look as if we were there at that minute.  So, that is one of the reasons why I am really excited to start this project.  I am ready to make a simple picture come to life!

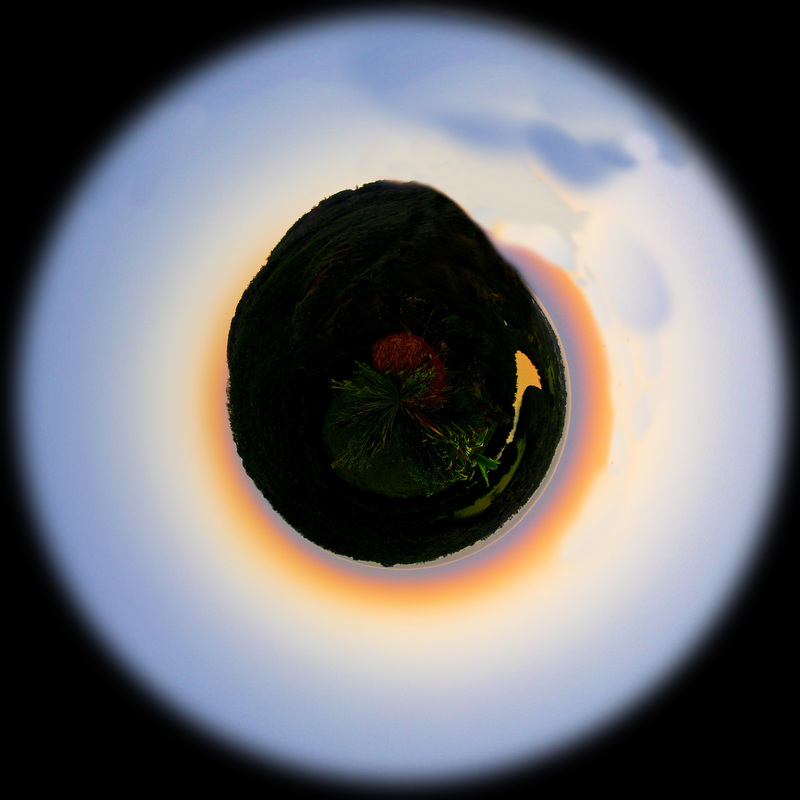
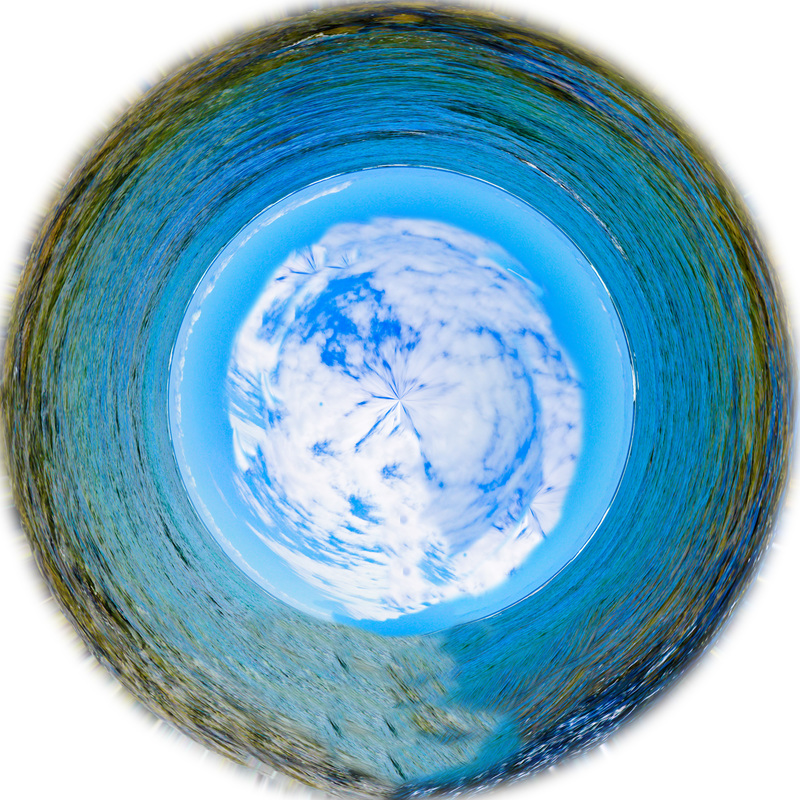
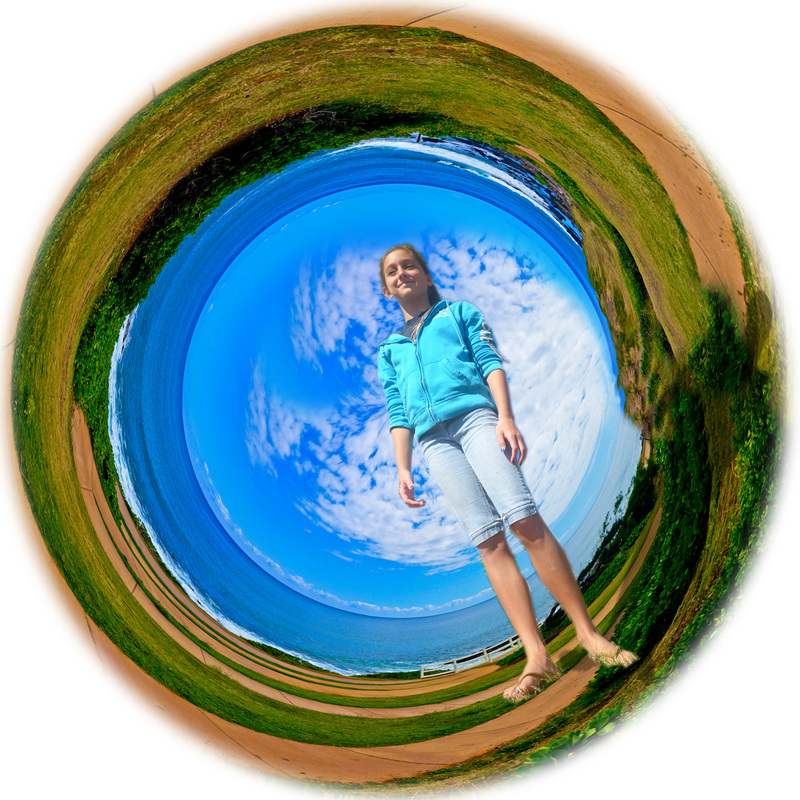
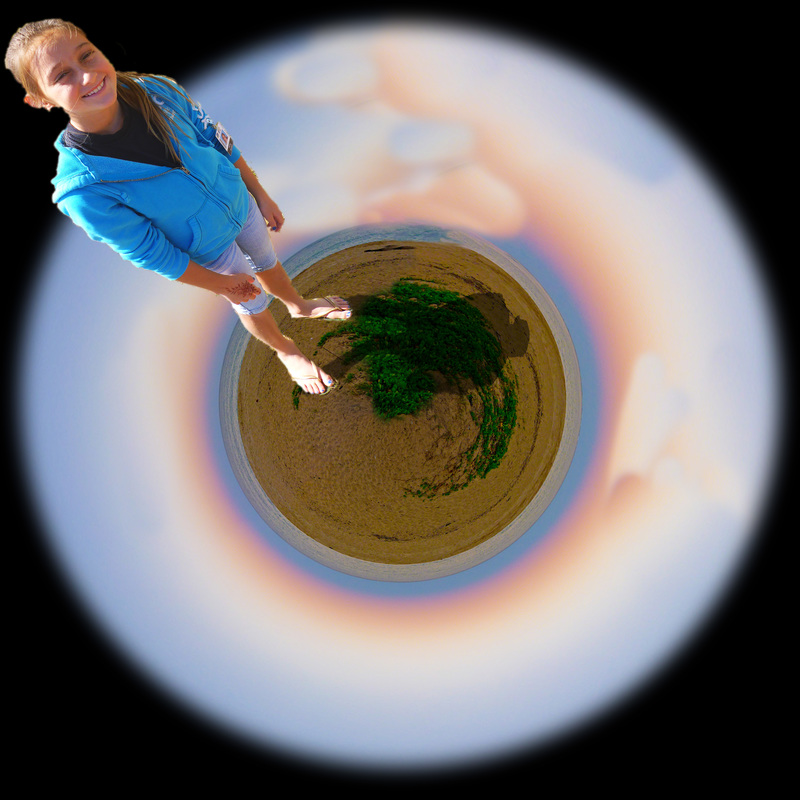
So I was talking about spherical and polar panoramas however I think that you might not know what they are, so I will tell you a little bit about them.  First off, spherical panoramas look like you are on the ground looking up and seeing the world around you.  Also, when you have your finished polar panorama it looks like you are in space and looking at the world in a little ball.  Aside form finishing appearances, how they look when there done, there are also some differences in the making.  This is the part when you distinguish whether or not you are looking down or up on the world
. So when you are in Photoshop and you are making your polar panorama you flip it upside down - 180 degrees - unlike when you are making your spherical panorama you just leave it right side up.  And those are some differences about spherical and polar panoramas.

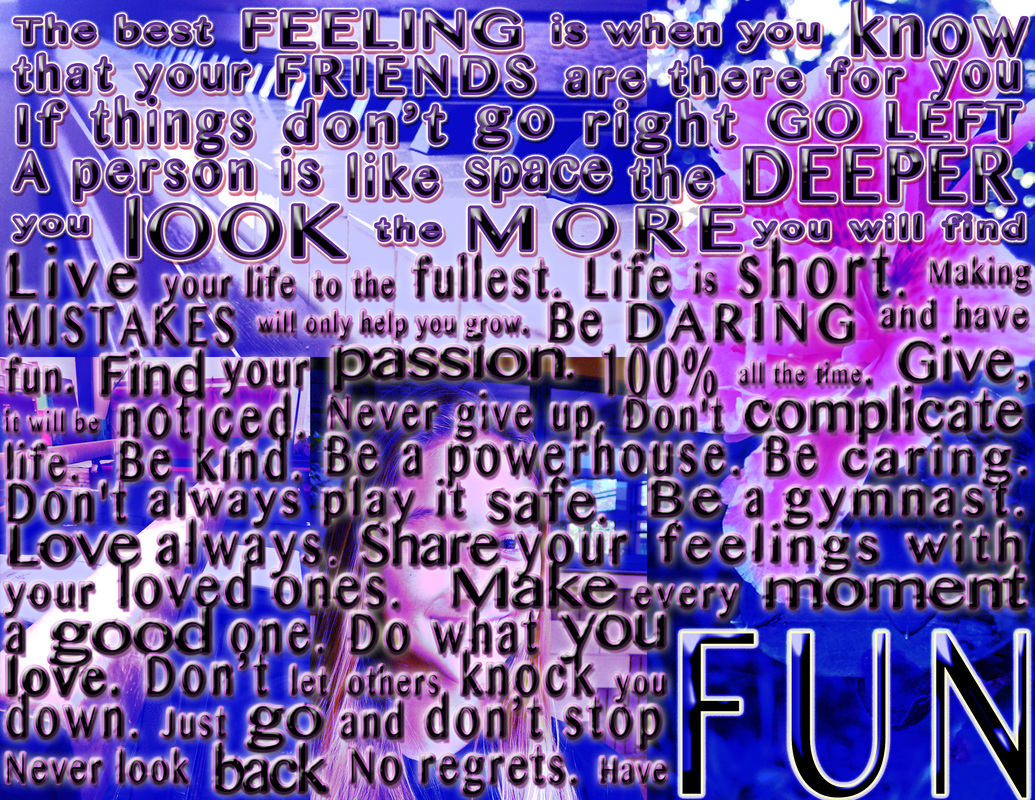
Our little tiny worlds are pretty convincing because we used a lot of different Photo Shop tools to create a realistic piece of art. Some of the tools we used was the stamp tool.  We used the stamp tool to make the line that connected either end of the panorama disappear.  We have to Make that line disappear so that it will look more complete and look like it is meant to be together, and it looks more realistic that way.  So, the stamp tool takes a lot of patience and to me that is the hardest part.  What makes it hard is that on one end of the panorama is grass and the other end is a house, it wont connect.  So the strategy that you have to use to place everything in the right place that makes sense is really hard.  And that is a little bit about the tools that we used to make our tiny worlds realistic.

Picture
Picture
Picture
Picture
Picture
Picture
Picture
Picture
0 Comments

Hockney Style Joiners

1/30/2016

1 Comment

 
Hi, again its me, I just wanted to talk to you about a new project that we are starting, its actually the very first one in 2016!!!!  I am really excited, we are working in photoshop for this project.  Anyways, we are going to be making photomontages.  Our main inspiration for this project is David Hockney.  Now when we first started talking about him I had no idea who he was, but now I know a lot, and if you ever see his work, it's really cool.  So David Hockney's photomontages are a little different from ours.  For example, he uses a different camera, an older camera and so it turns out a little bit different from ours.  Also, he is a professional so he is way more experienced.  On the other hand, we are just starting for the first time.  Lastly, we take about 15-25 pictures to create our photo montages while he uses hundreds of pictures.  And thats a few reasons why David Hockney's photo montages are different from our photo montages.

While we were taking about our new project, photo montages, we were taking about what we were going to take a picture of.  In this particular class, that matters a lot.  We are always talking about how its very important to post and create pictures that have a positive message, because there are many people out there who create pictures with a negative message.  So, in order to create a picture that has a positive message you have to do a few things.  One being you have to make sure that, that pictures is there for a reason.  In my, opinion I think that when you create an image you should have a message or meaning to it, not just a picture that is there for people to look at.  I think that sending a positive message when you create an image is really imprtant because that is what people all around the world are looking at and sometimes, that determines there mood.  And that is why I think that sending a positive message when making pictures is EXTREMELY important.

Now, since we were taking about sending out different messages and weather or not they are positive or negative. I think that the message that I am trying to send out is fairly simple. I think that it is important that the message is clear to the viewer and so I am trying to work on that. however it may not come across, that is why I am going to explain to you what I am trying to say when I create my image. So I really want people to know that I am very active and athletic. So in order to make this message come across I took the picture in a gym. Also, I hope that people will understand that I really enjoy gymnastics and being a part of a team. If you look really close into my image that I created you will see some gymnastics equipment. I made sure that I took the picture in a corner of the gym so that people could see every piece of equipment. I tried to include the se
t of bars we have, the 2 beams, and the floor-X space that we have, to show where I am. And that is a little bit about what happened behind the image.
Picture
Picture
1 Comment

2016 Aspirations

1/15/2016

0 Comments

 
Hi again, It's finally 2016 and its time for some new year goals.  Well, first off I really want to set some school goals.  I want to be able to read more on my own time.  I think that reading more will help me be more efficient with all of my school work.  Also, I would really like to continue to get straight A's on all of my report cards.  I know that, that may not happen, however I can always strive for more.  The last of my school goals is that I really want  to get a good score on my end of the year SBAC test.  I also have some outside of school goals.  One of them is in gymnastics, I really want to be able to get my back walkover, back handspring, back tuck on the beam by my self.  I am super close, but for me its really scary.  The last of my new years goals is also in gymnastics.  I want to get to level ten and go to Las Vegas for competition.  And those are some of my hard but attainable for 2016 goals.

So out of the five goals that I want to achieve in the year 2016 I really want to achieve my first goal that I listed.  That goal was to be able to read more and not only in school but on my own time.  I think that, that goal will play a roll in some of my other goals as well.  I think that me reading more will get my grades up to a steady 'A'.  Therefore, I will be able to work on my gymnastics a little bit more.  Also, I think that it is all about the book that you choose to read.  I think that I don't always choose a good book so I don't want to read it.  In my opinion, this wont be a difficult goal to achieve however I just have to get a book that I enjoy and want to read.

Well, there are many ways that I can get to these goals.  And I will be going through that process with you step by step.  Now these goals are very different so these steps will only relate to my number 1 goal which is to be able to read more, and on my own time.  So first of all reading requires a book.  In my opinion, this is the most important part of being able to read more.  You have to get a really good book in the genre that you are interested in.  So that will start by going to the library and checking out a really good book.  Also, I think that I just read and it will sooner or later grow on me.  And thats how I will try and attain my goal for 2016.

Picture
Picture
Picture
0 Comments

Scratch Game Design

11/30/2015

11 Comments

 
​
Hi, again!  Well, we just finished another short little project and I will tell you a little bit about this project.  Well, first of all it is a chase game.  So, the player's’ character, or sprite, is getting a chased by a computer controlled sprite.  Anyways, so I will tell you about how I thought of the user that would be playing my games.  First of all I thought of the time, I thought that time would be a big thing.  I mean, you don’t want the user to get bored, when playing your game.  For example, when I first created my chase game in scratch I set the scoreboard to say that every ten seconds you get 1 point, and when you get 10 points you win, however I figured that the user would get bored pretty fast.  To win it would be a least like almost 2 minutes.  So, to fix that problem all I did was I decreased the time so that instead of every 10 seconds you score a point, now it only takes 5 seconds to score a point, and that way it only takes the user about 50 seconds to win the game.  And that is how I thought of the users experience when creating my games in scratch.

Well, each of my games are really different.  First of all, one of my games is a chase game, where a user controlled sprite (a monkey named Bob) is being chased by two other computer controlled sprites which are ghosts.  In that game, every, say maybe 6 seconds, it changes the background.  I’m pretty sure that it has 4 different backgrounds.  Anyway, my second game is a platformer game.  This is where a dinosaur has to jump to different moving platforms to get to a little ball and that is where it changes levels.  However, when you get to the first ball you change levels, and move onto level 2.  After you get the little ball on level 2, you win!  And that is just a little bit about my two scratch games that I made.

Well, with these amazing games and animations, come bugs.  Bugs are basically just technical errors that you find in your games.  So, I have definitely experienced many bugs just in this short time period.  I mean, I am a beginner so you can’t blame me……….RIGHT?  Anyways, some examples of those bugs was, one time I finally figured out how to make it say YOU WIN!” when you get to a certain amount of points, but for some reason it was saying it like five different times all around the screen, and it didn’t make sense.  Until, I found that I put that little area of code in every different sprite when it was only supposed to say it in the main sprites area of code.  So, once i figured that out my game ended a lot smoother.  Anyways, what I am trying to say is that I worked really hard and put a lot of effort into it, however it will never end up to be perfect… and you just have to accept that.  And that is just a little lesson that I learned in this short little coding project.


Picture
This is a picture of some of my most complex pieces of code
11 Comments

Invention Commercial

11/24/2015


P3T4_Invention from Kapaa Middle School MEDIA on Vimeo.

Well, hi again!  We just finished a new project where we have to make an invention, then create a commercial that describes what your product is, why we need it and how it works.​ Anyways, our team really just wanted to get a good grade.  However, in this project we were put to the test in time management.  We had to meet every single deadline.  And there was a lot! Some examples of the deadlines were, the Invention idea approval and the commercial plan approval and many more.  So having good use of our time was EXTREMELY important in this project.  There was many deadlines and in order to get a good grade you had to meet all of the deadlines right on the dot.

Now in this project there are many 'team moments' in this process.  Now there are a couple that I will share with you, but first my favorite 'team moment' was on the second day of filming.  So we were planning on going to Ashton's house but then we realized that it might be a little be awkward if there were 3 seventh grade girls going over to his house.  So, we then decided to go to my house.  Anyways since we filmed the day before we forgot that we weren't wearing the same clothes.  Ashton, one of the main characters, was wearing a bright purple shirt and the day before he was wearing a grey shirt.  So we didn't think about what we were going to do because he didn't have a grey shirt.  Since we were at my house we were looking for a shirt or jacket that would kind of look like his other shirt that he wore.  Anyways, he ended up wearing my grey, fluffy, Hollister jacket.  It was pretty funny.  However he didn't want to wear my AWESOME jacket so we had to re-film everything in the shirt that he was wearing so he didn't just change shirts in the middle of the video.

Well, after filming all of this craziness, we had a lot of editing ahead of us, so we all knew that it was best for our team if we split up all of the work.  So, we just took turns and we each spent a little time editing.  The other people that were not editing were either giving suggestions to the editor or telling them what the order for the shots are.  Using this little system we got work done efficiently and we ended up getting our project done on time and to the best of our ability.  In my opinion, I actually think that we did a really good job.  I mean of course, there are always ways that we could improve the quality of our work and .do a better job.  However, with the time frame that we had to complete this project I am more than satisfied with our final product.  And with that I will tell you that..............we aced it...............4 OUT OF 4 BABY!!!!!!!!!  And that is just a little bit about our 1st group project in the 2015-2016 G.T year!
Picture
Picture
Picture
Picture
Picture
Picture

Composition Scavenger Hunt

11/6/2015

0 Comments


P3T4_Composition_2015 from Kapaa Middle School MEDIA on Vimeo.

Hi, again! I just wanted to tell you about a small project that we just finished in G.T.  This project was kind of hard because of the time, but it ended up pretty good.  Any way the project was about the 20 different composition techniques.  In my opinion I think that extreme close up is pretty important.  I think this way because extreme close up shows the most detail and it brings in the audience to feel what that character is feeling.  Making sure that the audience feels what the character is feeling is what filming is all about.  And those are some reasons on why I think that the composition technique extreme close up is so important, it shows a lot of detail and brings in the audience.

Well, the hardest composition technique out of the twenty there are is leading lines.  I think that leading lines is the hardest composition technique to accomplish correctly because, this technique uses lines that nature has made and to find the lines that lead exactly towards your subject.  Also, this is a really challenging composition technique because the lines that lead to your subject cannot just be lines coming out from any part of the shot.  They have to be lines that come out of the point of view of the photographer, and to me that is pretty challe
nging.  I can really improve and make things easier by just doing it more often.  And you know what they say.... practice makes perfect.  Also, I can just study the type of lines that people use to make a great leading lines shot. And that is a little bit about how I think of the composition technique, leading lines.

In our finished video, it took a lot of effort to finish this small project.  I'd say that the time was the hardest part.  I mean you think your doing alright and your going to be on time and then, BAM, your project is due in just a few minutes.  Anyways, we all contributed to the ending product of this video.  On my team was, Jhoanna Domingo, Denae Sacramed, and Ashton Barker.  Me and Jhoanna did most of the work, but we all contributed a lot.  Well m
e and Jhoanna did a lot of the filming and Denae and Ashton did a lot of the editing.  Even though, Jhoanna and I did most of the filming, Denae and Ashton did most of the in front of the camera stuff.  And even though Denae and Ashton did a lot of the editing, Jhoanna and I did help them decide which music to chose and where to place the different clips that we shot.  Overall, I still think that we did a good job dividing the work up evenly.  Well, at least we tried to.  Oh and I hope you enjoy our video, if you haven't already watched it yet.  We put a lot into it.....Most of our lunch!​
Picture
Picture
0 Comments

Cracking the Code

10/26/2015

0 Comments

 
Hi, its me again!  I just wanted to update you in what we are doing in our G.T. class right now.  We are learning about coding.  It seems like everyone is having pretty fun but its just not really my "cup of tea".  Anyway, even though I am not a huge fan of coding I still think that it is very important that everyone learns how to code.  I mean overtime I think that we should always be striving to improve. But without coding we are not able to invent and improve things so that we can make our lives easier.  And that is why I think that we should stress teaching children how to code. We will be able to have an easier and healthier way of living.

Well, now I will tell you a little bit about my first experience with coding and programming.  It was in this G.T class and we were actually playing a little game that you wouldn't think that it involves a whole bunch of lines of code.  We had to move the character on the screen to accomplish the level.  Some of it was pretty easy but others it got really confusing.  I would have to ask the person I sit next to - a sixth grader.  So, I wouldn't necessarily say that, that was the most awesome first experience of coding, in my opinion.  However, it's really important so I am glad that I know a little bit about it.

If I could design my very own program, game or app it would be an app that tells you if you are getting the right price for your clothes.  I mean have you ever gone to a store saw something that you really like and it's pretty expensive, but you buy it anyways? Then a couple days later you see that same shirt for like, half the price.  I have...... and it's not the funnest thing.  Anyway, this app will give you prices of that same shirt in other stores and then find the lowest price.  This app will save plenty of time and will for others, save a lot of money.  And that is what my app would be. 


​  
Picture
Picture
Picture
0 Comments

My Humorous Monologue

10/1/2015

0 Comments


RicciardiA_Comedy from Kapaa Middle School MEDIA on Vimeo.

Well that was something.... you might be wondering what I am talking about, so I will tell you.  We are so close to finishing our humorous monologue and I have learned so much over this time.  It is the beginning of the year and so I needed a little bit of a refresher, and this is what I have learned.  We learned how to properly use imovie.  For example, when I first opened up imovie I was a little confused because the format was different than last year and I wasn't quite sure how to change it back to what it used to be, and so I eventually learned how to change it back.  Lastly, I learned how to stay organized.  My teacher Mr. Sanderl, he is like an organization monster.  He will definitely not let one little file be out of place.  I mean it is kind of hard to keep up with it, but I am glad that we have to do it.

Another thing that we learned about was padding.  Padding is when you leave a few seconds before and after the footage that you are filming.  This method is used when filming because it takes the camera a few seconds to process what is happening.  This is very important because without padding you may cut off the first few words/seconds of what you are filming.  The same goes for after your footage. Without padding after your footage you might cut off the last few words/seconds  in your footage.  And that is why padding is CRUCIAL when you are filming.

During this project I had my ups and my downs.  A few ups that I had was when we first started editing.  It pretty much came to me naturally and I got a huge jump start because I had all of my b-roll and I was able to stay on task and correctly place my b-roll onto my audio, therefore I was ahead so I could start on my effects and transitions earlier than others.  Some down parts for me on this project is when we had to complete our b-roll filming.  We only had one week to complete all of our filming and I was pretty busy that week so finding time to film was kind of hard for me.  For me I could improve, a lot on keeping up with all of the due dates and not only making sure that I make them, but making them with exemplary work.  And that's a little bit about how the first project in my class went. 


Picture
Picture
Picture
0 Comments

Comedy Writing

9/17/2015

0 Comments

 
Hi, its me again.  We - as in my G.T class - are starting a new project, and it is a humorous narrative.  We are talking about how to write a joke and all that stuff.  But we are also talking about sense of humor. It is VERY important to have a sense of humor because you don't want to be telling a joke and be all serious about it because the audience will see that you aren't having fun with it so they will think that it is very funny and they will not have fun.  The whole part about writing  humorous narrative is to make the audience have fun and laugh.  That is why having a sense of humor is very important when you are writing a humorous narrative.

Well now you know  a little bit about what we are doing right now in class. Now I will give you 5 little tips on actually writing a comedic monologue or humorous narrative.  First off, you definitely have to make sure that your jokes will apply to the audience.  You have to make sure that the audience will be able to understand/relate to your jokes.  Also, you have to make sure that your jokes are appropriate for your audience.  You absolutely have to make sure that you are not offending anyone. Another thing is that when you speak your narrative, you need to speak with enthusiasm so that your audience gets engaged.  Also, you CANNOT steal a joke or idea from someone else.  Last but definitely not least you have to know that you will not get the entire audience to laugh, and you just have to accept it.  And those are 5 tips for writing a humorous narrative. 

Now, I will tell you about my humorous narrative.  It is about me and how clumsy I am.  To be honest it was actually really hard for me to come up with the idea.  My friend, Denae thought of it.  Because I always trip so much she was thinking of ways that I could make fun of myself, and when I heard the idea - it stuck.  This is pretty much what it's about...  I am a gymnast so you wouldn't think that I would be that clumsy, but I am.  I think that this is kind of a funny subject because it is making fun of me.  Therefore, no one will get offended, and they will be laughing at me.  And at least I can take a joke so I wont get terribly embarrassed.  Lastly, I think that  my humorous narrative will be funny because someone constantly tripping and embarrassing themselves will become funny.  And that is a little bit about my humorous narrative.


Picture
My Laughing GIF:)
0 Comments

Motivational Poster

9/3/2015

0 Comments

 
If you read my last post, you will know that we are starting a new project called personal manifesto.  So far it is going pretty well, but just so you know what I am going through I will tell you all of the requirements.  First of all we have to have 2 text layers, one for your personal quotes and another for your personal manifesto - by the way we are doing this project in Photoshop.  Also, we need to have 4 image layers, 3 of which are symbols that represent you.  So all together you should have 6 layers. Now, going into details.  We have to have our text fill up the entire page, and make sure that their are no holes or empty spots. We also have to use Triadic Color Scheme. That is when 1 color is harmoniously balanced with 2 accent colors on the color wheel.  We definitely cannot forget about visual balance.  When placing all of our pictures in Photoshop we have to make sure that there is balance.  Last but not least we need to use blending options for our text layers and adjustment layers for all 4 of your image layers.  And that is some of the requirements for our current G.T project, personal manifesto.


Alright now I know that you think that this would kind of be easy because its just edited text and images in a Photoshop document, but its not.  This is how I did it, first I wrote down my personal quotes and and personal manifesto in my google drive. I wrote it down in google drive first instead of Photoshop because Photoshop doesn't have spell check, and I really don't want to spell anything wrong.  Then I copied and pasted it into a Photoshop document. After that we needed to have those 4 pictures so I took the pictures at home as homework.  Once I had all of my pictures I added those to my Photoshop document too.  Now that I have everything in that document I had to start editing.  The first thing that I did was Kern my text so that some words would be bigger than others and they would all fit nicely across the page.  this was probably the hardest part just because you moved very slowly and everything was very precise.  After I was done Kerning I had to put a bunch of effects on the text, as it said in the requirements.  Now I have finished all of the text and is ready to start editing the pictures.  This is the part where we have to add visual balance, by placing the pictures in the document so that they cover up he entire space.  Finally, the fun part is adding color effects on the pictures.  Once yo have done that and checked over EVERYTHING, you are ready to hit, save, and turn it in.

Now in this process a lot can go wrong.  And I will tell you about my biggest challenge when doing this project, it is actually pretty tragic).  Anyway it was the last day to work on this project and I was rushing to finish it.  It came down to the last 5 minutes and I was feeling great about turning it in and finishing it on time to the best of my ability.  But as I was going to hit save and turn it in, Photoshop gave the worst message......."Photoshop has unexpectedly closed."  I was devastated!  This meant that all of my work that I had done that day was down the drain.  So I had to turn in unfinished work that I knew was terrible.  I was so mad, especially because this was something that I could have prevented.  I could have kept pressing save so that every time I made a change it would save.  I definitely learned a big lesson, to press save EVERY TEN SECONDS!!! And to keep trying. I felt that it was the end of the world and that I was going to get a terrible grade but none of that happened so it made me keep trying, at the end of it all I am glad that this happened, I learned a very valuable lesson. At the bottom of this post you will see that there is a Finished motivational poster.  


Picture
Picture
Picture
0 Comments
<<Previous
Forward>>

    Categories

    All
    G.T. Portfolio
    Personal Updates

    Picture
    Quote Of The Week-
    "When it hurts it matters"
          -John Green

    Author

    I am currently an honors student at Kapa'a Middle School in 8th grade, who loves to do gymnastics and piano.  I enjoy being with my family and going to the beach.

    1P GT BLOGS Gr. 8
    Ashley Alfiler
    Kyla Bautista
    Ella Beck
    Kyllie Belmonte
    Kalista Brigante
    Kacie Burns
    Julianne Castro
    Taylor Chang
    Jhoanna Marie Domingo
    Alakai Gonsalves
    Makaio Gonsalves
    Sophia Gregory
    Cara Griffin
    Jason Hoy
    Linden Johns
    Zephen Kaneakua
    Meleana Keawe
    Wailana Marvin
    Jaesha Mata
    Shanden Matsushima
    Micah Miller
    Blossom Novoa
    Ashley Ricciardi
    Denae Sacramed
    Michael Perry
    Alina Puig
    Shaday Thomas
    Steven Villanueva
    Cephas Woodward


    2P GT BLOGS Gr. 6-8
    Jeanne Casem
    AJ Galiza
    Katharine Hoesel
    Meah Jensen
    James Kessler
    Nicholas Koo
    Kaile McKeown
    Callum Meredith
    Lili-Ann Mundon-Burgonio
    Dana Murata
    Moira Nagle
    Josiah Nelson
    Treysen Nishida
    Eve Ohai
    Malie Osakoda
    Elena Panui
    Justin Panui-Shockey
    Dylan Rabot
    Ian Raquel
    Kaulia Shiroma
    Brody Smith
    Isaiah Squire
    Megan Tagoshi
    Tyler Tanaka
    Michael Tittnich
    Sofia Tittnich
    Mele Tokuda
    Angela Walther
    Akasha Youn

    3P GT BLOGS Gr. 6-8

    Cate Abadicio
    Stephanie Aguinaldo
    Anaya Alameida
    Malia Alo
    Gillian Altman
    Ella Anderson
    Jb AraulaCody Bailey
    Ashton Barker
    Julian Bejar
    Richard Cabalona
    Alexis Chatfield
    Raja Counts
    Aftan Dodd
    Kiersten Donner
    Miranda Duarte
    Isaac Dubey
    Lucas Freitas-Diaz
    Seline Gage
    Anthony Gallego
    Jazmyne Ganir
    Danielle Gunn
    Coral Haeger
    Emily Hartshorn
    Alexander Henriques
    Sophia Ibanez
    Mikaila Keawe
    Gavin Leines
    Emily McDaniel
    Chelsea Schneider
    Viora Yamamoto
    ​

    Old Blogs:
    Lani Alo
    Kyler Arruda-Sukehira
    Daileen Barton
    Timothy Blum
    Quinn Consylman
    Kaz Espina
    Lester Garcia
    Nathan Gardner
    Preston Hayden
    Diego Hernandez
    Madeline Hoesel
    Tessa Jensen
    Makena Kahananui
    Nahele Keale
    Raghav Kumar
    Raiden Kurisu
    Jasmine Laplante
    Kynan Ledee
    Meagan Mahikoa
    Charles McConnell
    Asha McGinnis
    Emma McGinnis
    Tu Nguyen
    Tyler Pagela
    Leilia Panui
    Celeste Velarde
    Kasiah Vercelli
    Alani Viets
    Talia Washington
    Hershel Weiner
    Loren Weiner
    Arianna White
    Kalani Young

    Archive

    March 2017
    December 2016
    October 2016
    September 2016
    August 2016
    May 2016
    April 2016
    March 2016
    February 2016
    January 2016
    November 2015
    October 2015
    September 2015
    August 2015
    May 2015
    April 2015
    March 2015
    February 2015
    January 2015
    December 2014
    November 2014
    October 2014
    September 2014
    August 2014

    RSS Feed

    Categories

    All
    G.T. Portfolio
    Personal Updates

    HHHHHHHHYHYHhhhyjskadlhdjlfas
    Picture
    Picture
Powered by Create your own unique website with customizable templates.