Hi, I am going to be talking to you about HDR photography. Well HDR stands for high dynamic range, and is a technique used to make regular images look as if it was our eyes actually taking the photo. When using HDR photography I really like that you can edit your photo to look exactly how you want it to look, and not just with what you got on the camera. The one thing that I don't like about HDR photography is that you have to take multiple shots of the same thing with out the object or your camera moving. Also, when you go to merge them all together (we are using photoshop) if something had moved you will be able to see the movement and sometimes it does not turn out good at all. Those are some reasons why I dislike using HDR photography.
Creating an HDR photograph can take a while, but I am going to tell you the way that I created my HDR photograph. Well it doesn't take that long to take all of the pictures because you just keep it in the same spot and don't move the camera. For me, I took 7 photos for my landscape HDR and my experiment (a portrait that we named experiment) HDR, but you can take as much as you want. So after I took my 7 photos I uploaded them to my computer, after I have uploaded them I opened up photoshop because that is where I merged them all together. Then, once Photoshop merged them all together, you can customize it however you want by clicking the button that says "customize" in the top right corner. once I have customized it just the way I want I then have to save my beautiful picture by going, "file, then save as" Once I have saved where I wanted I am complete. The way that I just told you is a little different from just doing the automatic HDR way because in the automatic way the camera doesn't get all of the really dark spots and all of the really light spots as if you were to take the same shot several times at different exposures.
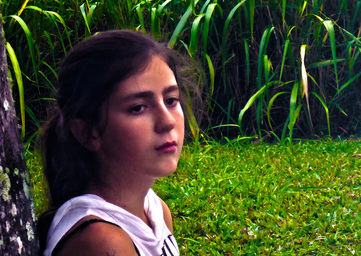
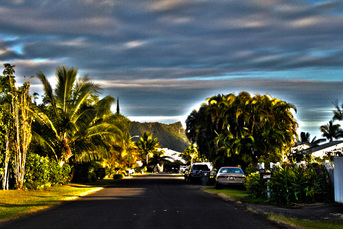
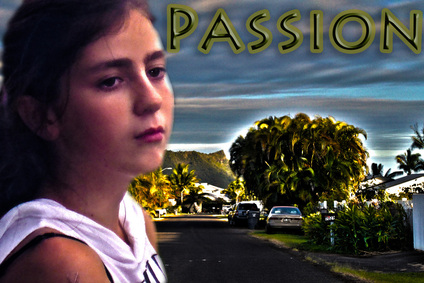
In the image that you see on the right is my landscape photo that I created in photoshop. Well as you can see there is a big tree on the right side that is the shape of a circle. In my head I wanted to have that tree stand out as my focal point. Then I really liked the shape of the clouds that day, so I wanted to make sure that I got some of those gorgeous clouds. Now for the photo on the bottom I have my landscape photo and experiment photo together in one photo. While I put these two photos together I wanted to make sure that I got both of the photos focal point in one image that didn't look too over crowded. When I first got this assignment I thought that it would just be hours of taking photos, but once I found out that we got to edit and customize our images it turned out to be really fun.
Creating an HDR photograph can take a while, but I am going to tell you the way that I created my HDR photograph. Well it doesn't take that long to take all of the pictures because you just keep it in the same spot and don't move the camera. For me, I took 7 photos for my landscape HDR and my experiment (a portrait that we named experiment) HDR, but you can take as much as you want. So after I took my 7 photos I uploaded them to my computer, after I have uploaded them I opened up photoshop because that is where I merged them all together. Then, once Photoshop merged them all together, you can customize it however you want by clicking the button that says "customize" in the top right corner. once I have customized it just the way I want I then have to save my beautiful picture by going, "file, then save as" Once I have saved where I wanted I am complete. The way that I just told you is a little different from just doing the automatic HDR way because in the automatic way the camera doesn't get all of the really dark spots and all of the really light spots as if you were to take the same shot several times at different exposures.
In the image that you see on the right is my landscape photo that I created in photoshop. Well as you can see there is a big tree on the right side that is the shape of a circle. In my head I wanted to have that tree stand out as my focal point. Then I really liked the shape of the clouds that day, so I wanted to make sure that I got some of those gorgeous clouds. Now for the photo on the bottom I have my landscape photo and experiment photo together in one photo. While I put these two photos together I wanted to make sure that I got both of the photos focal point in one image that didn't look too over crowded. When I first got this assignment I thought that it would just be hours of taking photos, but once I found out that we got to edit and customize our images it turned out to be really fun.
 |  |

 RSS Feed